Our How-To Home

  • How-To
  • DIY
  • Lifestyle
    • Recipes
    • Kristen’s Book Club
  • Blog
    • Home Updates

Explore

  • How-To
  • DIY
  • Lifestyle
  • Blog
  • About Us
  • Ask Us Anything
  • Kristen’s Book Club

Connect

You are here: Home / DIY / Easy DIY Mirror Barn Doors Using Reclaimed French Doors

DIY · November 22, 2021

Easy DIY Mirror Barn Doors Using Reclaimed French Doors

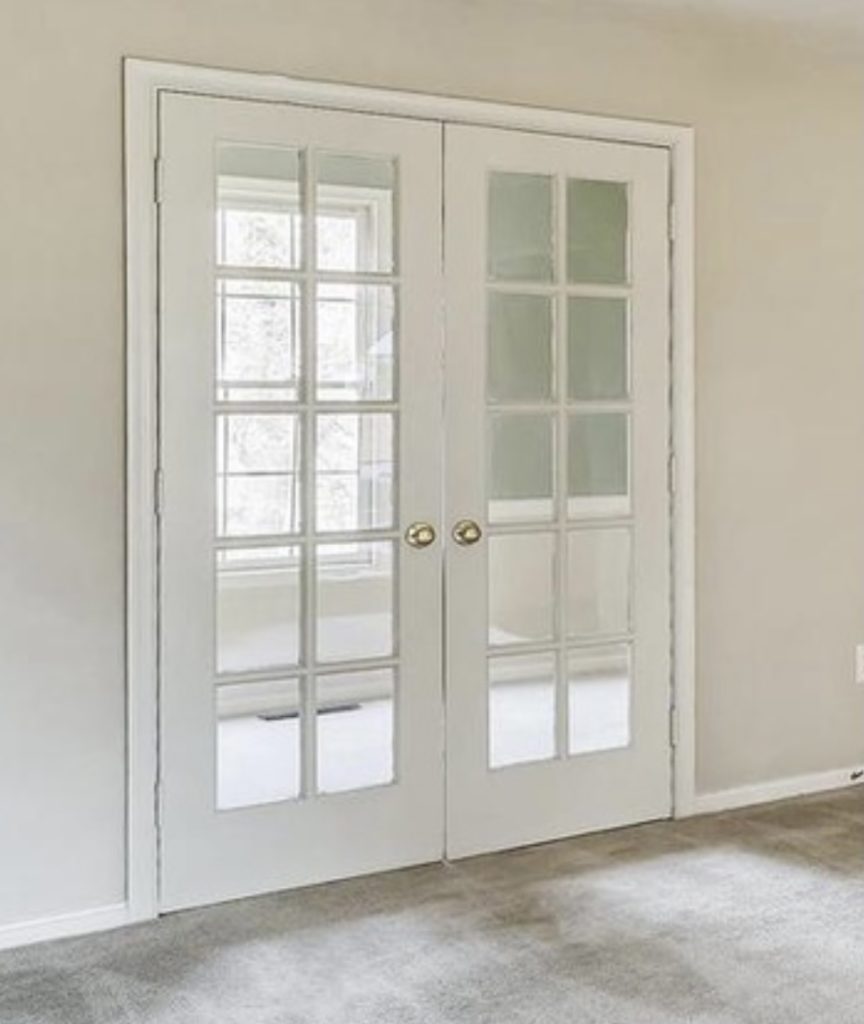
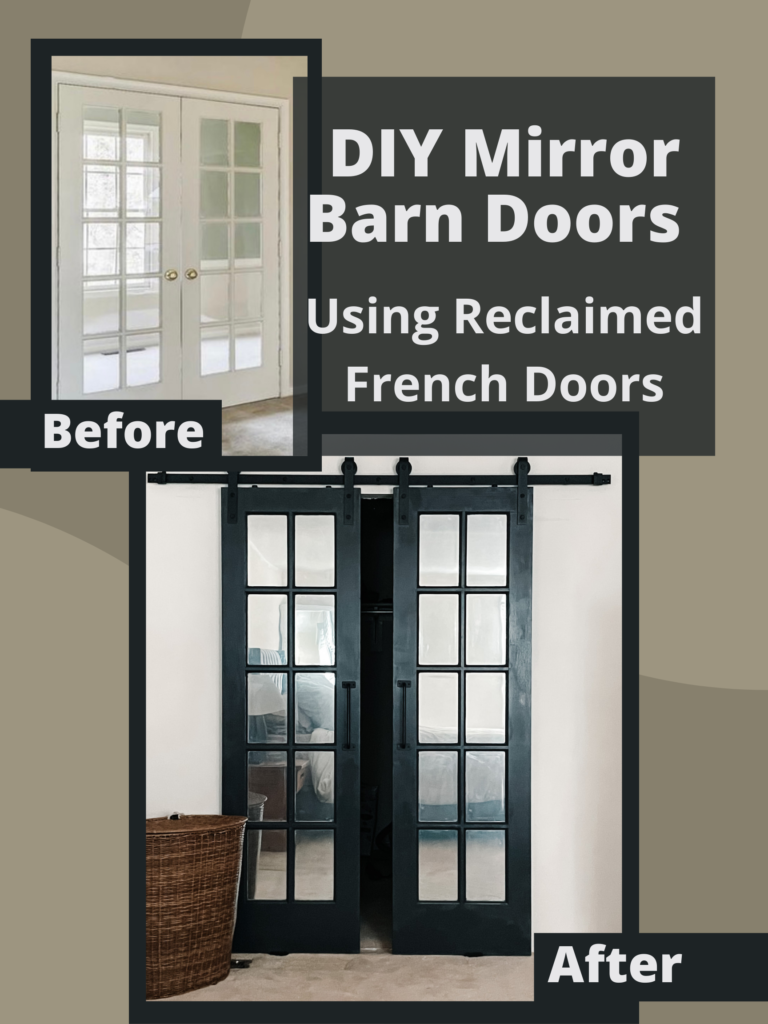
I’m so so excited about this project for a couple of reasons. First, we’re refurbishing old French doors that we saved from demoing our office (any time I can use old rather than buying new is a win for me) 2. I’m going to take inspiration from our glass barn doors and create cohesiveness in our house and 3. I’ve literally never seen this done before. I’m going to DIY mirror barn doors!


DIY Mirror Barn Doors

  1. Prep the Doors

These doors are in decent condition so I started by taking all of the hardware off the doors, including the hinges and the door knobs.

I got really lucky with these doors because as you probably know, most doors have a hole where the doorknob typically sits. What I didn’t notice about these is there was no latch, which means the door knobs were really just handles and were screwed on. It saved me a ton of time not having to patch massive door holes.

Next, the door got an initial sanding before patching the holes. For covering up the door hinges, nail holes and scratches I’m using Bondo. Bondo dries fast and hard; you can sand it and paint it just like regular wood. Since it dries so quickly, it also means you have to work really fast. Start by scooping some of the putty out onto a disposable surface. Then add a little bit of the hardening cream and mix well. (Be careful not to add too much of the hardening cream. I did this the first time and it pretty much turned into a brick within 4 minutes). Quickly apply the putty to your surface. If not applied right away, the putty will dry quickly and become unusable. It seemed to dry even faster in cold air.

I also went ahead and cleaned the glass of all the old paint residue using a knife and scraper.   

  1. Paint the Doors

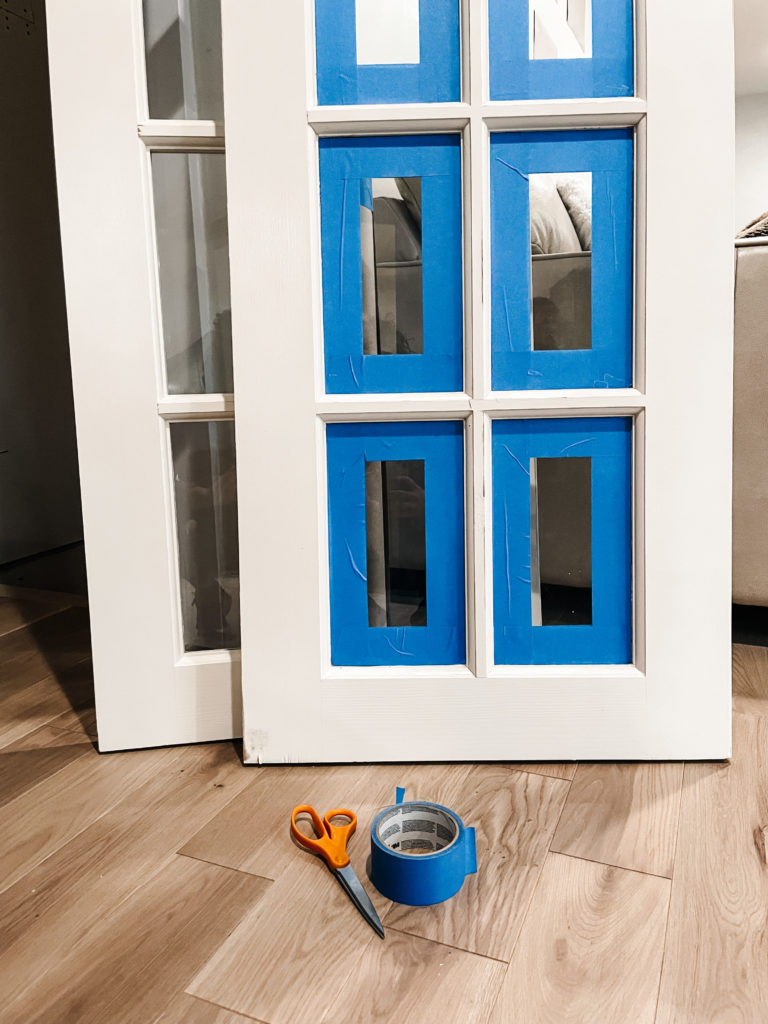
The next step was to paint the doors and since they likely haven’t been painted for years, I stared with a primer  

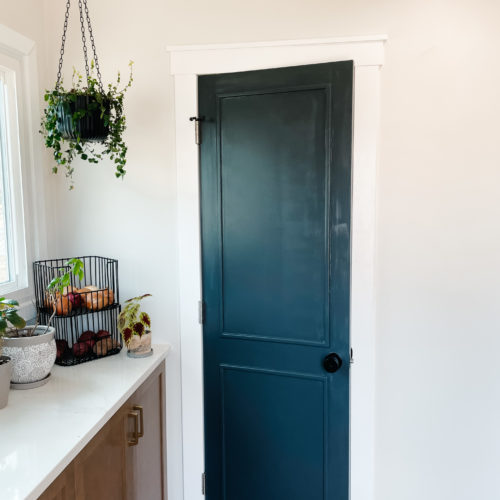
Once the primer was on, I went ahead with our signature door color: Satin Black by Behr. The doors ended up taking 3 coats of paint for full coverage and in some places still needed to be touched up.

Some paint did seep under the tape so I went back through and cleaned up the edges again with a knife. Then I re-taped them to prep the glass for the final paint job.

  1. Making Mirror

Now comes the best part of the DIY mirror barn doors – actually making the mirror! For that I used Rust-omleum Mirror Effect spray paint. Yes, you read that correctly, I’m spray painting mirror.

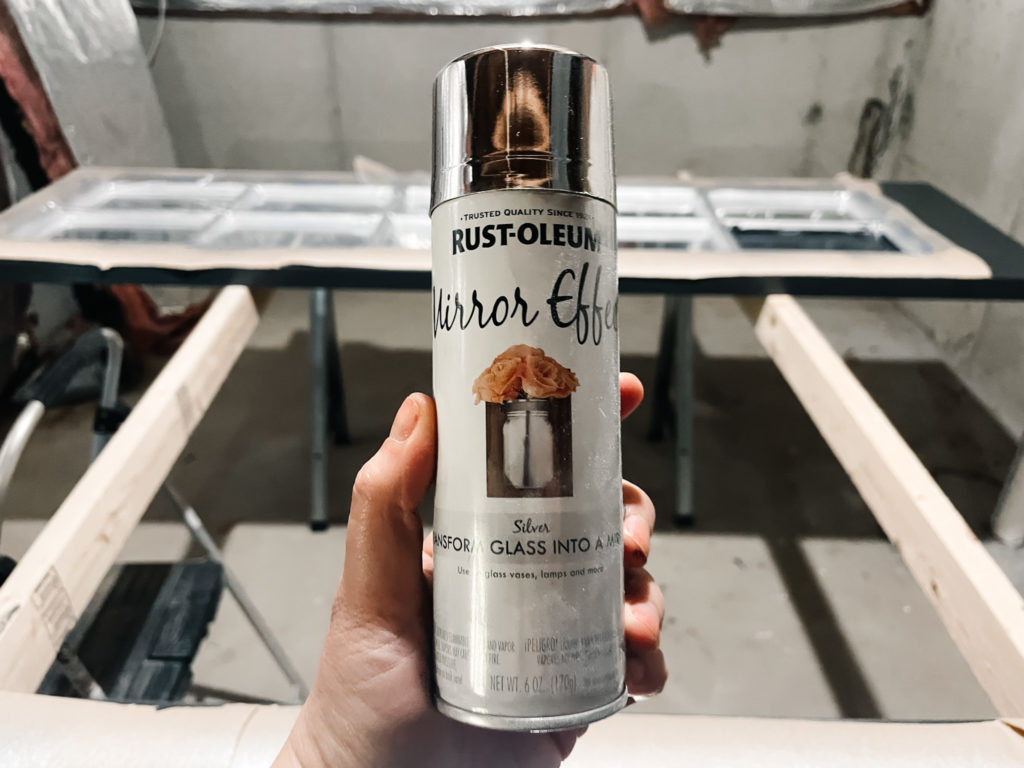
Originally I thought I was going to have to remove the glass and somehow install mirror in its place. I had no idea how to go about this and was so excited to find this paint as an alternative solution 

Now there are some really important things to note about use this spray paint.

  • The glass needs to be SPOTLESS. Any smudge, finger print or speck of dust or paint will there permanently if you do not wipe the glass down sufficiently.
  • To get the mirror effect I ended up needing to do 7 coats. Each coat was very light to avoid paint lines. All in all I used 4 cans of the spray paint for the doors.
  • Like all paint, this can still chip so it’s good to protect your paint job after completion to avoid chips or nicks in the future.

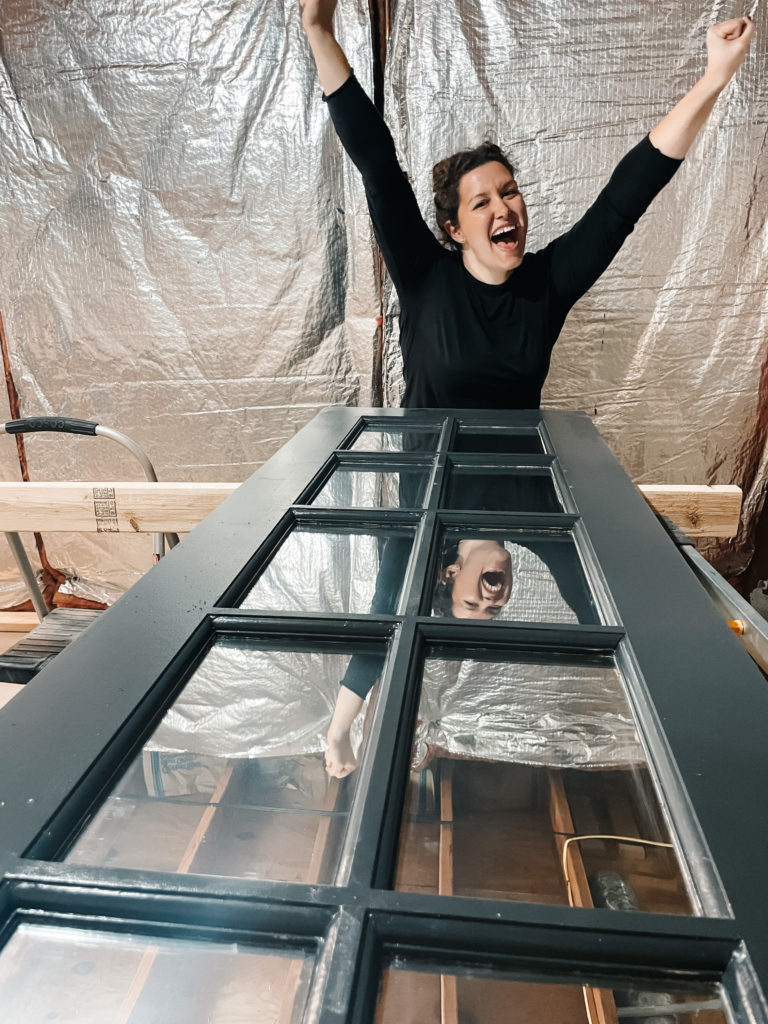
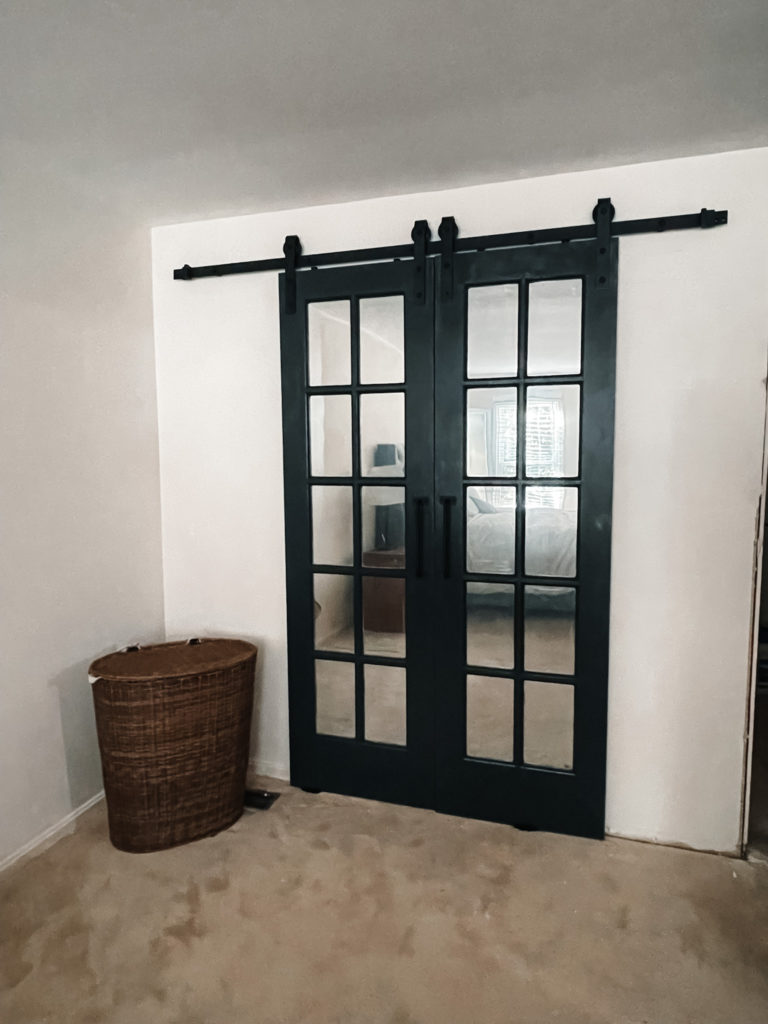
The big reveal comes at the end! When you’re spraying your paint its really important to remember that the side that your spray should be the BACK of your project. Once dry, flip the doors over and you have this beautiful mirror on the other side!

  1. Install the DIY Mirror Barn Doors

Finally came installation day! I got this barndoor kit off of amazon and followed the instructions to install. If you remember from last week, we have the header built into the wall already. Otherwise I would have to install that first.

I used a lazer level to make sure everything was level, but ultimately it was just a long arm workout using the socket wrench to lock everything in place. Check out the video above to learn how to install the barn doors and how to pick the right bit size and socket wrench.

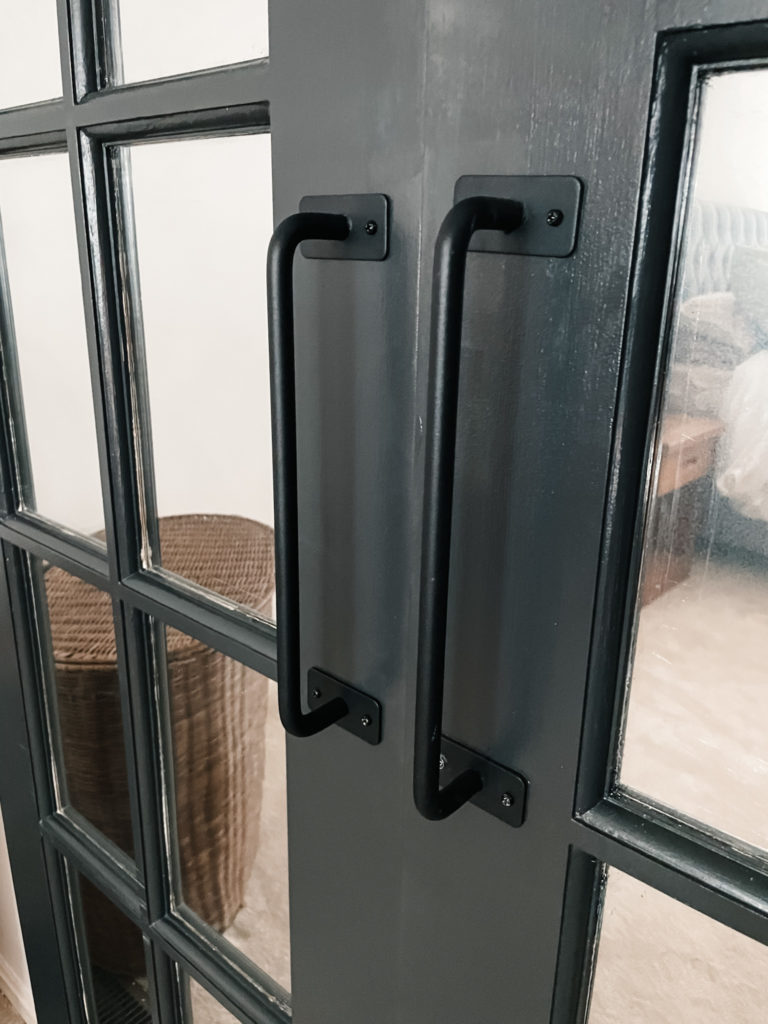
The final step was to install my rollers and handles to the door. For this I drilled holes into the door and then used my socket wrench to secure the hardware in place.

These doors turned out exactly as I had hoped and we absolutely love them! They’re the perfect addition to our closet. Check out the final product!
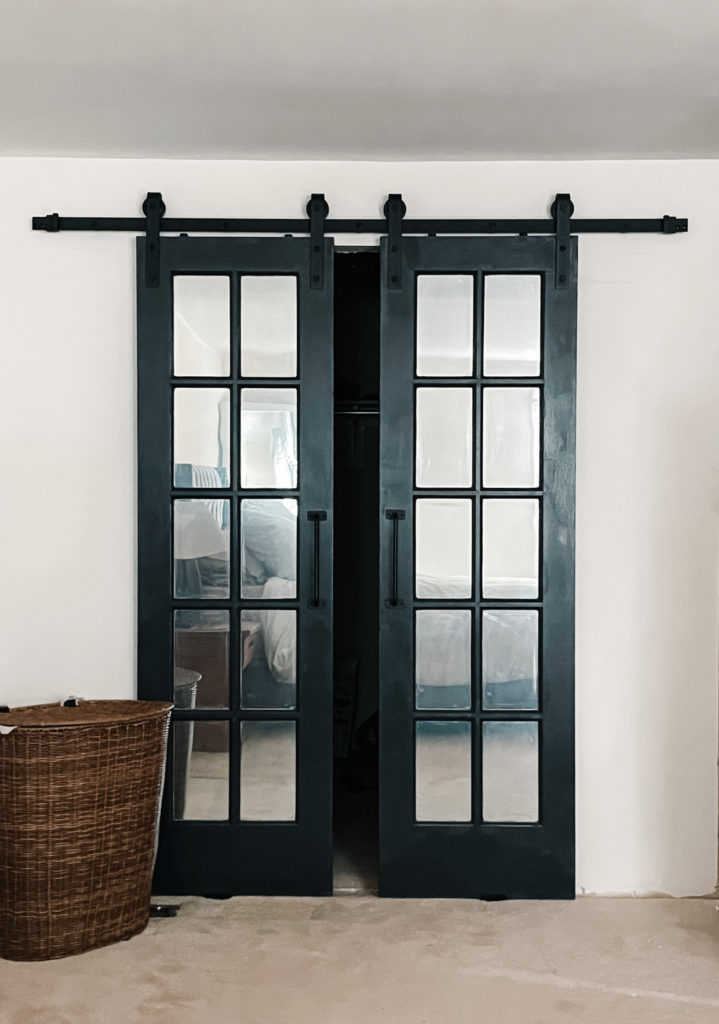
Shop the Post

Barn door handles

Barn Door Hardware

Posted By: Kristen · In: DIY

Make a Doorway in an Existing Wall
Holiday Gift Guide 2021

You’ll Also Love

Easily Install Cement Board to Prep for Tile Installation
Check Out These Easy Tricks to Install a Subfloor
black door with decorative trim and white craftsman moldingChange your Home’s Whole Look with Simple Custom Door Trim

Leave a Reply Cancel reply

Your email address will not be published. Required fields are marked *

Recipe Rating


Trending

  • Want a Black Interior Front Door? How New Trim And Paint Change Everything
  • Our Beautiful Traditional Brick House With Black Windows Remodel
  • Mini Chicken and Waffles – The Ultimate Brunch Appetizer!
  • Glass Barn Doors Gave Our Office A Stunning Modern Look
  • Gray, black and gold powder bathroom
    Get the Room: Details & Links – The Powder Room

Categories

  • Blog
  • DIY
  • How-To
  • Lifestyle
    • Kristen’s Book Club

More You’ll Love

Our New Kitchen Window is here!

Our New Kitchen Window is here!

Your Easy Guide to Patching a Drywall Hole

Your Easy Guide to Patching a Drywall Hole

How our Kitchen Laundry Closet Became a Luxury Powder Room

How our Kitchen Laundry Closet Became a Luxury Powder Room

ourhowtohome

Scarlett Annette Mangold ♥️ You are so so lov Scarlett Annette Mangold ♥️ 
You are so so loved baby girl.
One view of this nursery just isn’t enough😍 One view of this nursery just isn’t enough😍

We’re days away from meeting our little girl and if she’s anything like her parents we’re in big trouble! 

At least the room is cute. 

#nursery #babygirl #nurserydecor #nurseryinspo #nurserydesign #safaribaby #safaritheme #littlegirlsroom #38weekspregnant #whitefurniture #refurbishedfurniture #refinishedfurniture #diyhomedecor #diyprojects #housetohome
We’re so ready for you baby girl! When we starte We’re so ready for you baby girl! When we started working in the nursery there was not a chance I thought it would be totally ready in time. Close? Sure. But finished? No way. 

We are so lucky to have so many people help us along the way (and for getting so many great deals on marketplace to bring this room together!) 

Now all we need is a little girl to use it!

#nursery #nurserydecor #nurseryinspo #babygirl #babygirlnursery #safari #animalnursery #facebookmarketplace #refurbished #38weekspregnant #nurseryideas #babygirlroom #homedesign #bedroomdesign #changingstation #safaribaby
Bookshelves for the nursery are FINISHED!! Can yo Bookshelves for the nursery are FINISHED!!

Can you believe this was all done with scrap wood that we had in the garage? 

For our baby shower we asked guests to bring a book in lieu of a card and im obsessed. We have the perfect amount of new stories to fill our shelves and a million memories to make in this cozy nook. 

#booknook #bookshelves #bookshelvesofinstagram #childrensbooks #nursery #nurserydecor #nurseryinspo #scrapwood #scrapwoodproject #reelsinstagram #memoriesforlife #snuggletime #cozynook #reelsvideo #nurseryroom #nurseryinspiration #childrensroom #reelsviral #childrensroominspo
What a year it’s been! I feel like we’ve don What a year it’s been! 

I feel like we’ve done so much work to the house this year but when it’s almost all in one room, I’m realizing it doesn’t always look like it. 

With the nursery almost ready to go and baby girl coming any day, we can only begin to imagine the great things 2023 is going to have in store for us! 

Happy New Year everyone!

Thanks for sticking around and being a part of our story 💜

#newyearseve #2022recap #2022wrapped #homeprojects #2023 #happynewyear #housetoahome #primarybathroom #livingroom #homedecor #renovation #newyear #recap2022 #reelsofinstagram😍 #reelsvideo #homesweethome #homedesign #nursery #boardandbatten
GAME CHANGER After years of making gingerbread h GAME CHANGER 

After years of making gingerbread houses and waiting the torturous overnight for the icing to dry we finally asked the question - why are we doing it this way?
 
Hot glue for the win! We saved the icing for decorating and the brownstones we’re ready for decorating immediately. 

Even Kevin who was a skeptical gingerbread traditionalist agrees… we’re never going back!

#nevergoingback #gamechanger #rowhomes #gingerbreadhouse #gingerbread #reelsinstagram #instagood #christmascrafts #christmasdecor #reelinstagram #christmasreels #holidayseason #christmasvibes
When I found this sleigh in the Target dollar sect When I found this sleigh in the Target dollar section, I knew it needed to be part of our holiday decor this year. Only problem? It needed a little something extra- queue for the stain! 

This updated sleigh is so cute and the perfect addition to our mantle. I found this pine cone filler and mini ornaments to complete the look! 

#christmasdecor #sleigh #pinecone #miniornaments #mantledecor #merrychristmas #holidaydecor #holidaycrafts #reelsvideo #merryandbright #stain #sleighride #christmastime #holidayseason #reelforyou #christmasmantel
Load More... Follow on Instagram
  • Privacy Policy

Copyright © 2023 Our How-To Home · Theme by 17th Avenue