Our How-To Home

  • How-To
  • DIY
  • Lifestyle
    • Recipes
    • Kristen’s Book Club
  • Blog
    • Home Updates

Explore

  • How-To
  • DIY
  • Lifestyle
  • Blog
  • About Us
  • Ask Us Anything
  • Kristen’s Book Club

Connect

You are here: Home / How-To / Our Master Bathroom is a Complete Gut Job – The Demo

How-To · October 7, 2021

Our Master Bathroom is a Complete Gut Job – The Demo

The day finally came. The start of the project that equally excites and completely terrifies us. We’re going to gut and demo the Master bathroom OURSELVES. But to call this a master bathroom seems like a reach because it’s more like powder room that’s stuffed a shower into the corner. We’re so excited to blow out the wall and make use of the “vanity” area and is really just serving as a towel holder right now. Do we know what we’re doing? Absolutely not. Will we figure it out? I really hope so.

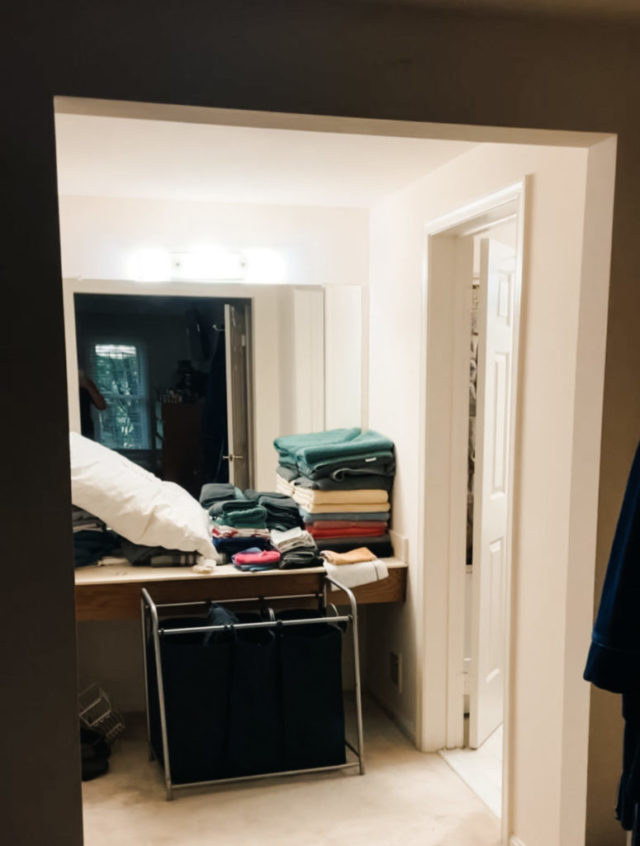
I should start by mentioning that we had previously demo’d part of the bathroom when we first moved into the house. Remember how our washer/dryer were in the kitchen? Our choices were to move them down to the basement or find space upstairs. Personally I really don’t understand the concept of a basement laundry room when everyone lives on a completely different floor. In order to make the a stackable washer/dryer unit fit upstairs, we demo’d the Master Bathroom shower and built an alcove in our hall closet. This room is now the laundry room… or really closet. As a bonus, this has created a completely rectangular room for our new bathroom. All we need to do now is remove the wall between what’s left of the bathroom and the vanity. 

Breaking Down Walls

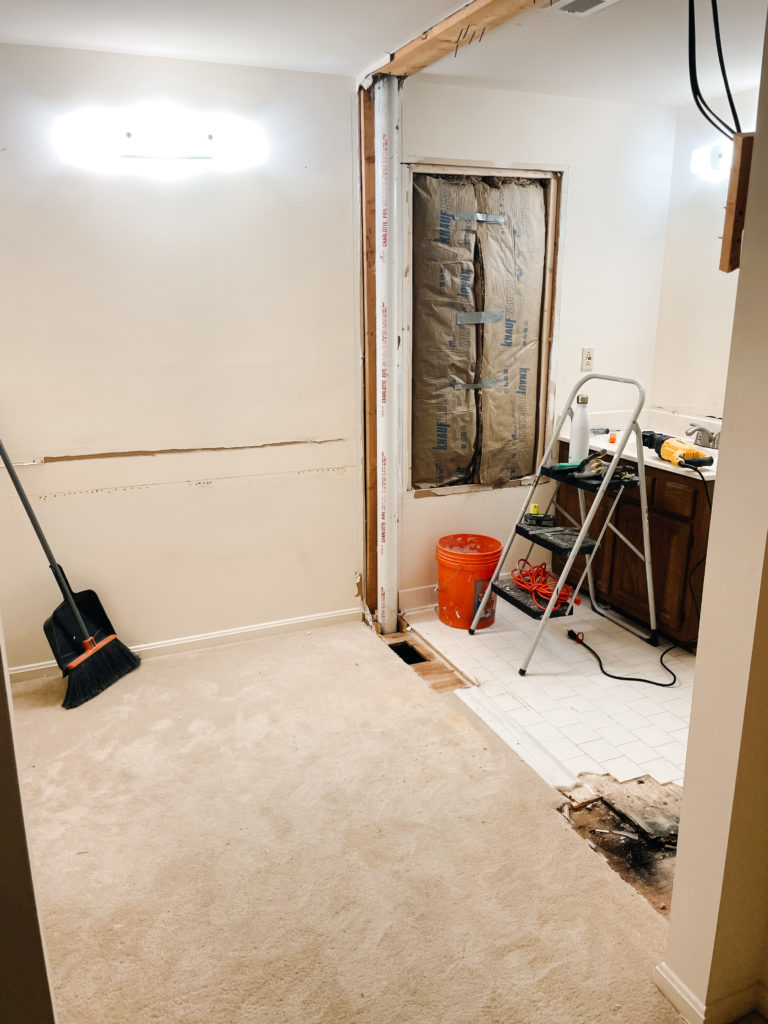
The first thing to go was the vanity piece and drywalls. I figured getting the bathroom floor and sink vanity out would go much easier without this big dividing wall so that’s what I did. The drywall is by far the messiest part of the project and while I tried to pull it down in big sheets, these builders were nail gun happy so they make it almost impossible to pull anything out easily. Using a sledge hammer, I hit the wall at a perpendicular angle to create holes in the drywall and then using my hands, pulled up big chunks at a time.

Once the drywall was off, things moved really quick.

When a wall is built, studs are used to framed the ceiling and floor with 2×4’s placed roughly every 24 inches (in older houses) in between for non-load bearing walls. In newer houses they could be as close as every 16 inches. This makes the wall very sturdy and it also makes it difficult to demo without the right technique. The easiest and fast way to demo a stud wall is with one of my favorite tools, a reciprocating saw.  Cut each stud on a downward diagonal which will allow you to slide the top and bottom piece away from each other. The best way to visualize this is in the video above. Using a saw makes this process to so quick because once the pieces are separated, you can pry them off by simply pulling them.

Once the walls were removed, I was able to start pulling up the floor. As this was two separate rooms up until a few minutes ago, I had carpet and tile to deal with. I started with the tile since I knew it was going to be a challenge.

Tile is made up of 3 different layers above the subfloor: cement board, mortar, and then tile. When you demo tile, you need to pull up all three until all that you are left with is the subfloor. Typically to do this, you would cut down the tile into moveable pieces and then use a crowbar to pry the whole thing up in one attempt. 

Whoever installed this floor really wanted it to stay there forever. There were easily 400 nails in this tiny piece of flooring. These are the things I tried that didn’t work:

  1. A shovel to scrape the tiles off fist to make it less heavy
  2. A crow bar to pull up the plywood
  3. Using a hammer and chiseling the pieces one at a time.

I finally ended up using a circular saw to cut through the tile and plywood (definitely not what the blade was designed for), dividing it into smaller pieces and then using a large crowbar to pull it up. It was still a ton of work and I was a sweaty mess which explains the shirt change in the video.

If you’ve been here for a while carpet was super easy to do. I saved it until I really needed a win and after the tile… I REALLY needed a win.

In the next posts I’ll break down what we did next – aka removing the toilet and sink. This process was not as difficult as I thought it was going to be and don’t worry, I break it down for you so you’re not scared either. 


How to demo a bathroom: Next Steps

How to Remove a Toilet
How to Remove a Bathroom Vanity


Posted By: Kristen · In: How-To

Glass Barn Doors Gave Our Office A Stunning Modern Look
Check Out This Trick to Naturally Age Terracotta Pots

You’ll Also Love

Easily Install Cement Board to Prep for Tile Installation
Check Out These Easy Tricks to Install a Subfloor
En Suite Bathroom plan with grey slate floors, white tile backsplash and warm brown cabinetsOur Master Bath Mood Board: Chic With A Touch Of Warmth

Leave a Reply Cancel reply

Your email address will not be published. Required fields are marked *

Recipe Rating


Trending

  • Want a Black Interior Front Door? How New Trim And Paint Change Everything
  • Our Beautiful Traditional Brick House With Black Windows Remodel
  • Mini Chicken and Waffles – The Ultimate Brunch Appetizer!
  • Glass Barn Doors Gave Our Office A Stunning Modern Look
  • Gray, black and gold powder bathroom
    Get the Room: Details & Links – The Powder Room

Categories

  • Blog
  • DIY
  • How-To
  • Lifestyle
    • Kristen’s Book Club

More You’ll Love

Easily Install Cement Board to Prep for Tile Installation

Easily Install Cement Board to Prep for Tile Installation

Easy DIY Clay Vase – Using Paint & Baking Soda!

Easy DIY Clay Vase – Using Paint & Baking Soda!

Our Main Floor: The Master Plan

Our Main Floor: The Master Plan

ourhowtohome

Scarlett Annette Mangold ♥️ You are so so lov Scarlett Annette Mangold ♥️ 
You are so so loved baby girl.
One view of this nursery just isn’t enough😍 One view of this nursery just isn’t enough😍

We’re days away from meeting our little girl and if she’s anything like her parents we’re in big trouble! 

At least the room is cute. 

#nursery #babygirl #nurserydecor #nurseryinspo #nurserydesign #safaribaby #safaritheme #littlegirlsroom #38weekspregnant #whitefurniture #refurbishedfurniture #refinishedfurniture #diyhomedecor #diyprojects #housetohome
We’re so ready for you baby girl! When we starte We’re so ready for you baby girl! When we started working in the nursery there was not a chance I thought it would be totally ready in time. Close? Sure. But finished? No way. 

We are so lucky to have so many people help us along the way (and for getting so many great deals on marketplace to bring this room together!) 

Now all we need is a little girl to use it!

#nursery #nurserydecor #nurseryinspo #babygirl #babygirlnursery #safari #animalnursery #facebookmarketplace #refurbished #38weekspregnant #nurseryideas #babygirlroom #homedesign #bedroomdesign #changingstation #safaribaby
Bookshelves for the nursery are FINISHED!! Can yo Bookshelves for the nursery are FINISHED!!

Can you believe this was all done with scrap wood that we had in the garage? 

For our baby shower we asked guests to bring a book in lieu of a card and im obsessed. We have the perfect amount of new stories to fill our shelves and a million memories to make in this cozy nook. 

#booknook #bookshelves #bookshelvesofinstagram #childrensbooks #nursery #nurserydecor #nurseryinspo #scrapwood #scrapwoodproject #reelsinstagram #memoriesforlife #snuggletime #cozynook #reelsvideo #nurseryroom #nurseryinspiration #childrensroom #reelsviral #childrensroominspo
What a year it’s been! I feel like we’ve don What a year it’s been! 

I feel like we’ve done so much work to the house this year but when it’s almost all in one room, I’m realizing it doesn’t always look like it. 

With the nursery almost ready to go and baby girl coming any day, we can only begin to imagine the great things 2023 is going to have in store for us! 

Happy New Year everyone!

Thanks for sticking around and being a part of our story 💜

#newyearseve #2022recap #2022wrapped #homeprojects #2023 #happynewyear #housetoahome #primarybathroom #livingroom #homedecor #renovation #newyear #recap2022 #reelsofinstagram😍 #reelsvideo #homesweethome #homedesign #nursery #boardandbatten
GAME CHANGER After years of making gingerbread h GAME CHANGER 

After years of making gingerbread houses and waiting the torturous overnight for the icing to dry we finally asked the question - why are we doing it this way?
 
Hot glue for the win! We saved the icing for decorating and the brownstones we’re ready for decorating immediately. 

Even Kevin who was a skeptical gingerbread traditionalist agrees… we’re never going back!

#nevergoingback #gamechanger #rowhomes #gingerbreadhouse #gingerbread #reelsinstagram #instagood #christmascrafts #christmasdecor #reelinstagram #christmasreels #holidayseason #christmasvibes
When I found this sleigh in the Target dollar sect When I found this sleigh in the Target dollar section, I knew it needed to be part of our holiday decor this year. Only problem? It needed a little something extra- queue for the stain! 

This updated sleigh is so cute and the perfect addition to our mantle. I found this pine cone filler and mini ornaments to complete the look! 

#christmasdecor #sleigh #pinecone #miniornaments #mantledecor #merrychristmas #holidaydecor #holidaycrafts #reelsvideo #merryandbright #stain #sleighride #christmastime #holidayseason #reelforyou #christmasmantel
Load More... Follow on Instagram
  • Privacy Policy

Copyright © 2023 Our How-To Home · Theme by 17th Avenue