Our How-To Home

  • How-To
  • DIY
  • Lifestyle
    • Recipes
    • Kristen’s Book Club
  • Blog
    • Home Updates

Explore

  • How-To
  • DIY
  • Lifestyle
  • Blog
  • About Us
  • Ask Us Anything
  • Kristen’s Book Club

Connect

You are here: Home / DIY / Make These Simple DIY Velvet Christmas Trees

DIY · December 5, 2022

Make These Simple DIY Velvet Christmas Trees

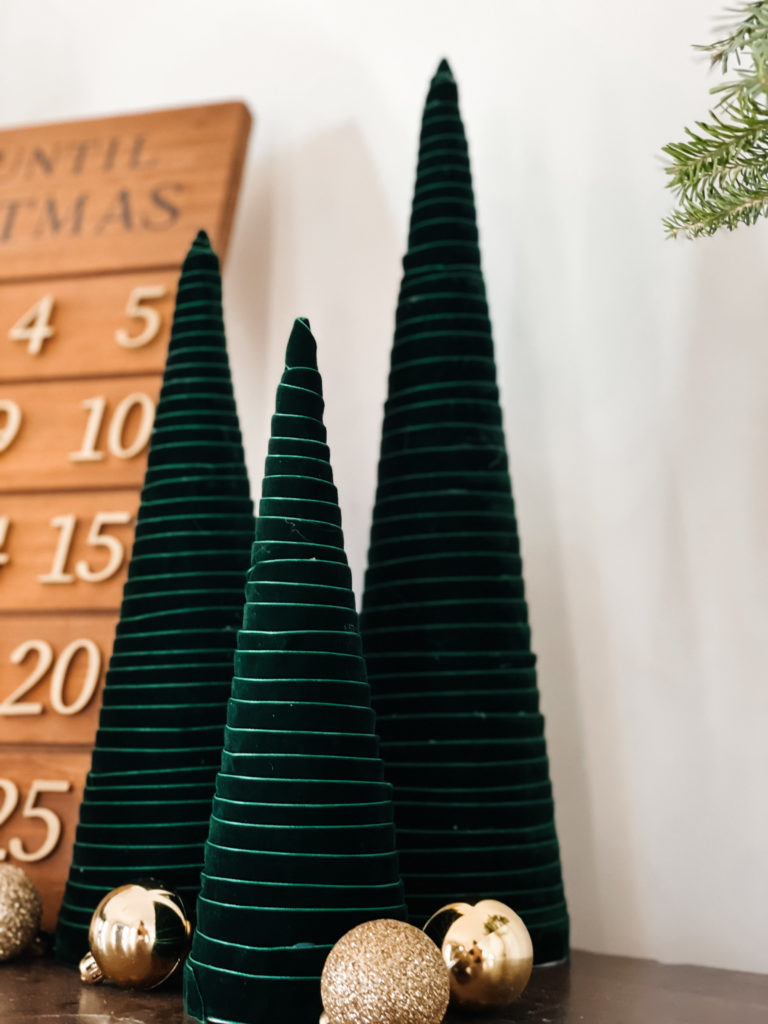
One of my favorite things about the holidays is not just decorating, but actually creating custom decorations. It not only gives me a chance to stretch my creativity, but also save us a bunch of money to spend on more important things.. like presents! When I saw these velvet Christmas trees for $60, I knew that I could recreate then for less. They’re modern, dramatic and so much fun. Plus they’re really easy to do! Check out below to see how I did it.

green velvet ribbon wrapped around cones to create a modern christmas tree

Materials Needed

  • Different sized cones
  • Velvet Ribbon
  • Scissors
  • Hot Glue 

First I need to say that I made the codes much more complicated than I needed to. I had already purchased foam floral cones from Michael’s Craft Store when I discovered the paper mache ones I have listed from amazon. While these cones are a few dollars more expensive, they would have saved me a lot of effort. 

For the velvet, I found this beautiful green ribbon and got a ton of it as I knew I was going to want to overlap the ribbon a ton as I wrapped it around the cone. I opted for a 5/8 inch thickness and 60 yards. I also figured that any extra, we could use to wrap presents this year. (Spoiler alert, we had a bunch leftover). 

My convoluted method: 

While the floral cones were a bit cheaper, I didn’t think about the fact that they were made from styrofoam. Under normal circumstances this wouldn’t be an issue, but I later learned that styrofoam and hot glue do not mix. The glue will essentially melt the foam and make it unusable. At the same time, I also wanted to add a peak to my cones as the floral tops were flat. Because of these reasons, I opted to wrap the cones in thick paper (I used scrapbooking paper) using super glue. This actually ended up being pretty challenging so just go ahead and get the cones. 

How to make DIY Velvet Christmas Trees
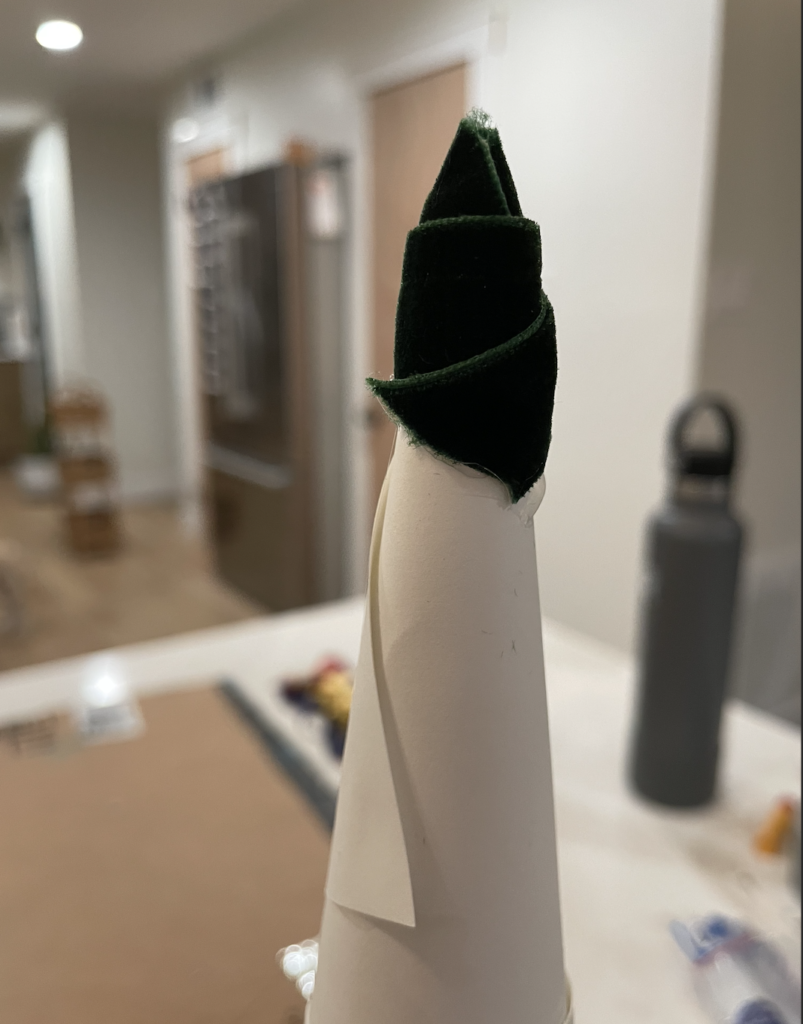
Step 1:

The best way I found to start the peak of the tree is by cutting the ribbon into 2 small pieces first. With the first piece, I created the tip. As you can see by the photo below, the angles are pretty aggressive making it impossible to use one constant piece. Take your hot glue and secure the piece completely. With the second piece of ribbon begin to set your angle. For me, this was a bit of a transition piece and while if doesn’t necessarily seem like it, was definitely needed. 


Step 2:

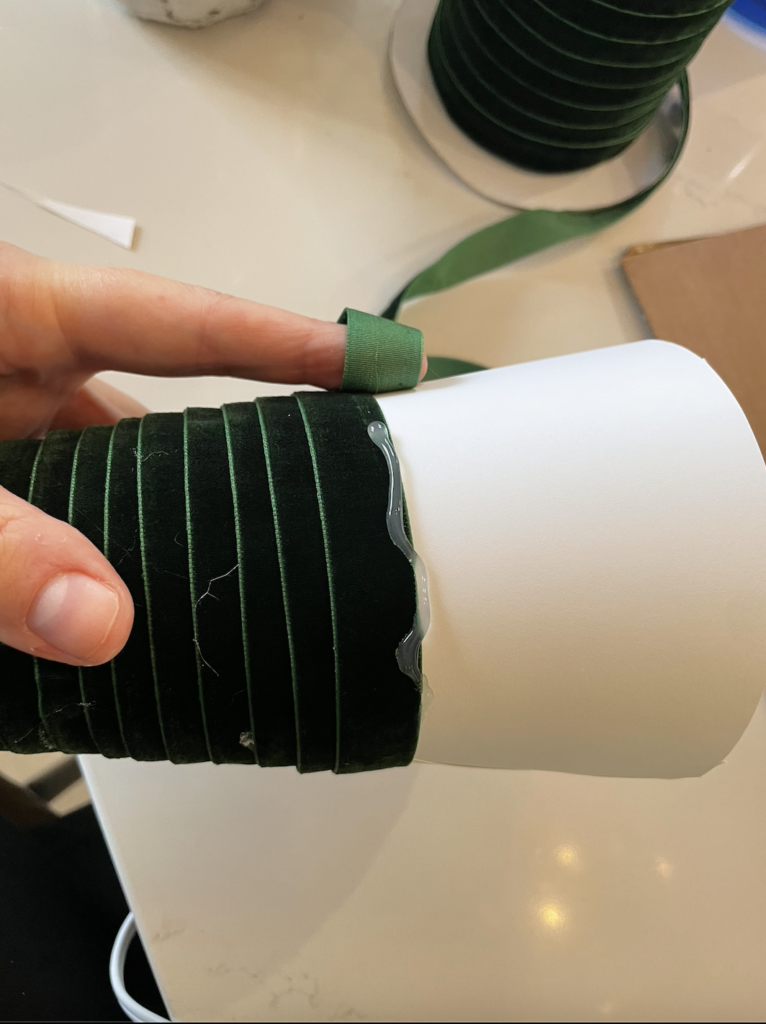
Next I was able to take the ribbon and begin wrapping the rest of the cone to create the velvet Christmas trees. This process is very simple, but even once you get into the rhythm it takes a while. I learned the hard way to only apply a little bit of hot glue at a time, running it along the base of the already attached row. It will dry quickly so I typically added about an inch of glue at a time. 

The ribbon covered about half of the row below it. This was a personal design choice, but I think it turned out really beautiful. 

Step 3:

Make sure to secure the bottom of your cone by applying glue around the whole base before adding the final row of ribbon. Cut the ribbon on an angle for a nice finished look and secure well with glue. 

Notes:

Be careful with where you add the glue. Once it’s on the ribbon, it’s almost impossible to get it off unnoticed. I had a few places where the glue seeped up over the top of the ribbon. While I was able to wipe it a little bit, you can definitely still see it. 

green velvet ribbon wrapped around cones to create a modern christmas tree

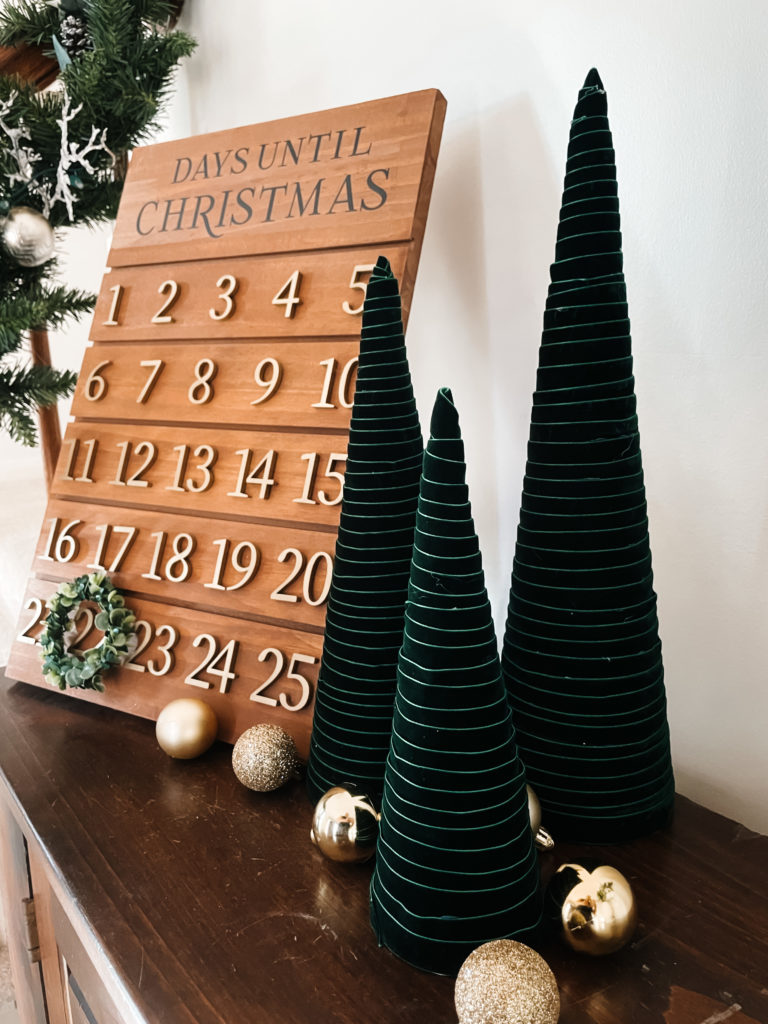
How stunning do these look?! I am so happy with how these turned out. They are dead ringers for those $60 trees that I found. 

The best part is you can recreate these trees in any color or ribbon type. (I was VERY close to doing a mix of three different white textures). 

These trees are going on our front entry table for everyone to see. Where will you put your velvet Christmas Trees?


Ps. For all of those asking, you can get the holiday calendar here!
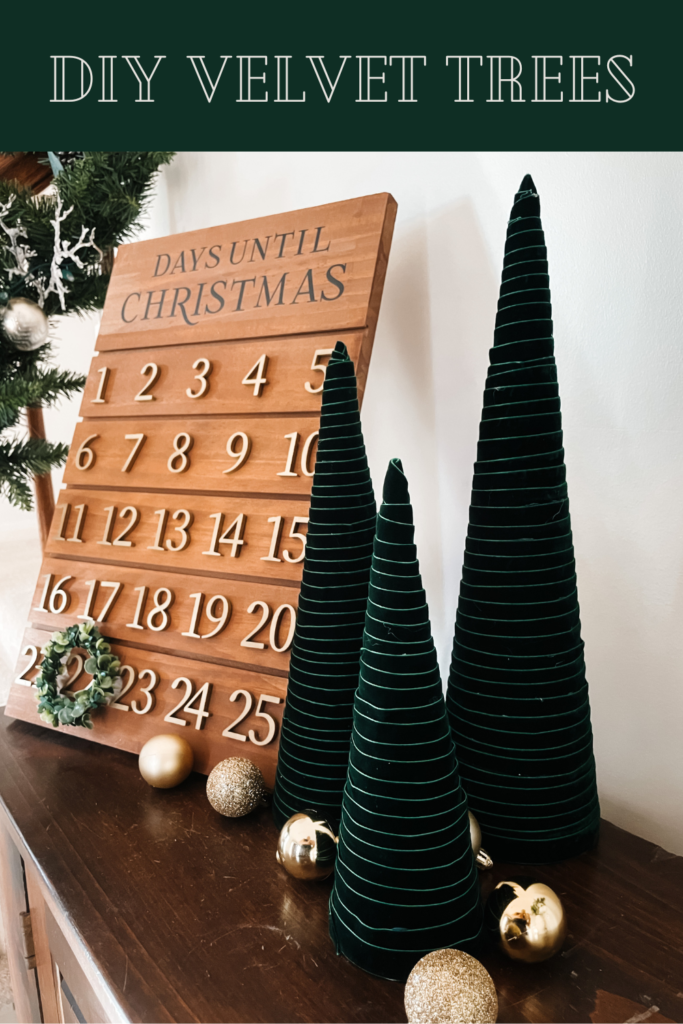
 green velvet ribbon wrapped around cones to create a modern christmas tree

Posted By: Kristen · In: DIY

Make Your Own Terracotta Pumpkins With This Dupe

You’ll Also Love

Make Your Own Terracotta Pumpkins With This Dupe
kitchen with sage cabinets, white quartz, brushed silver bosch appliances and gold hardwareGet the Room: Details & Links – The Kitchen
Glass of peppermint white russian cocktail with a chocolate and candy cane rimThe Best Peppermint White Russians

Leave a Reply Cancel reply

Your email address will not be published. Required fields are marked *

Recipe Rating


Trending

  • Want a Black Interior Front Door? How New Trim And Paint Change Everything
  • Our Beautiful Traditional Brick House With Black Windows Remodel
  • Mini Chicken and Waffles – The Ultimate Brunch Appetizer!
  • Gray, black and gold powder bathroom
    Get the Room: Details & Links – The Powder Room
  • Glass Barn Doors Gave Our Office A Stunning Modern Look

Categories

  • Blog
  • DIY
  • How-To
  • Lifestyle
    • Kristen’s Book Club

More You’ll Love

Recipe for Homemade Croutons – The Best Hack for Leftover Bread

Recipe for Homemade Croutons – The Best Hack for Leftover Bread

Mood Board For Our Kitchen Update- How To Make It Cozy

Mood Board For Our Kitchen Update- How To Make It Cozy

Mini Chicken and Waffles – The Ultimate Brunch Appetizer!

Mini Chicken and Waffles – The Ultimate Brunch Appetizer!

ourhowtohome

Scarlett Annette Mangold ♥️ You are so so lov Scarlett Annette Mangold ♥️ 
You are so so loved baby girl.
One view of this nursery just isn’t enough😍 One view of this nursery just isn’t enough😍

We’re days away from meeting our little girl and if she’s anything like her parents we’re in big trouble! 

At least the room is cute. 

#nursery #babygirl #nurserydecor #nurseryinspo #nurserydesign #safaribaby #safaritheme #littlegirlsroom #38weekspregnant #whitefurniture #refurbishedfurniture #refinishedfurniture #diyhomedecor #diyprojects #housetohome
We’re so ready for you baby girl! When we starte We’re so ready for you baby girl! When we started working in the nursery there was not a chance I thought it would be totally ready in time. Close? Sure. But finished? No way. 

We are so lucky to have so many people help us along the way (and for getting so many great deals on marketplace to bring this room together!) 

Now all we need is a little girl to use it!

#nursery #nurserydecor #nurseryinspo #babygirl #babygirlnursery #safari #animalnursery #facebookmarketplace #refurbished #38weekspregnant #nurseryideas #babygirlroom #homedesign #bedroomdesign #changingstation #safaribaby
Bookshelves for the nursery are FINISHED!! Can yo Bookshelves for the nursery are FINISHED!!

Can you believe this was all done with scrap wood that we had in the garage? 

For our baby shower we asked guests to bring a book in lieu of a card and im obsessed. We have the perfect amount of new stories to fill our shelves and a million memories to make in this cozy nook. 

#booknook #bookshelves #bookshelvesofinstagram #childrensbooks #nursery #nurserydecor #nurseryinspo #scrapwood #scrapwoodproject #reelsinstagram #memoriesforlife #snuggletime #cozynook #reelsvideo #nurseryroom #nurseryinspiration #childrensroom #reelsviral #childrensroominspo
What a year it’s been! I feel like we’ve don What a year it’s been! 

I feel like we’ve done so much work to the house this year but when it’s almost all in one room, I’m realizing it doesn’t always look like it. 

With the nursery almost ready to go and baby girl coming any day, we can only begin to imagine the great things 2023 is going to have in store for us! 

Happy New Year everyone!

Thanks for sticking around and being a part of our story 💜

#newyearseve #2022recap #2022wrapped #homeprojects #2023 #happynewyear #housetoahome #primarybathroom #livingroom #homedecor #renovation #newyear #recap2022 #reelsofinstagram😍 #reelsvideo #homesweethome #homedesign #nursery #boardandbatten
GAME CHANGER After years of making gingerbread h GAME CHANGER 

After years of making gingerbread houses and waiting the torturous overnight for the icing to dry we finally asked the question - why are we doing it this way?
 
Hot glue for the win! We saved the icing for decorating and the brownstones we’re ready for decorating immediately. 

Even Kevin who was a skeptical gingerbread traditionalist agrees… we’re never going back!

#nevergoingback #gamechanger #rowhomes #gingerbreadhouse #gingerbread #reelsinstagram #instagood #christmascrafts #christmasdecor #reelinstagram #christmasreels #holidayseason #christmasvibes
When I found this sleigh in the Target dollar sect When I found this sleigh in the Target dollar section, I knew it needed to be part of our holiday decor this year. Only problem? It needed a little something extra- queue for the stain! 

This updated sleigh is so cute and the perfect addition to our mantle. I found this pine cone filler and mini ornaments to complete the look! 

#christmasdecor #sleigh #pinecone #miniornaments #mantledecor #merrychristmas #holidaydecor #holidaycrafts #reelsvideo #merryandbright #stain #sleighride #christmastime #holidayseason #reelforyou #christmasmantel
Load More... Follow on Instagram
  • Privacy Policy

Copyright © 2023 Our How-To Home · Theme by 17th Avenue