Our How-To Home

  • How-To
  • DIY
  • Lifestyle
    • Recipes
    • Kristen’s Book Club
  • Blog
    • Home Updates

Explore

  • How-To
  • DIY
  • Lifestyle
  • Blog
  • About Us
  • Ask Us Anything
  • Kristen’s Book Club

Connect

You are here: Home / DIY / Make Your Own Terracotta Pumpkins With This Dupe

DIY · October 31, 2022

Make Your Own Terracotta Pumpkins With This Dupe

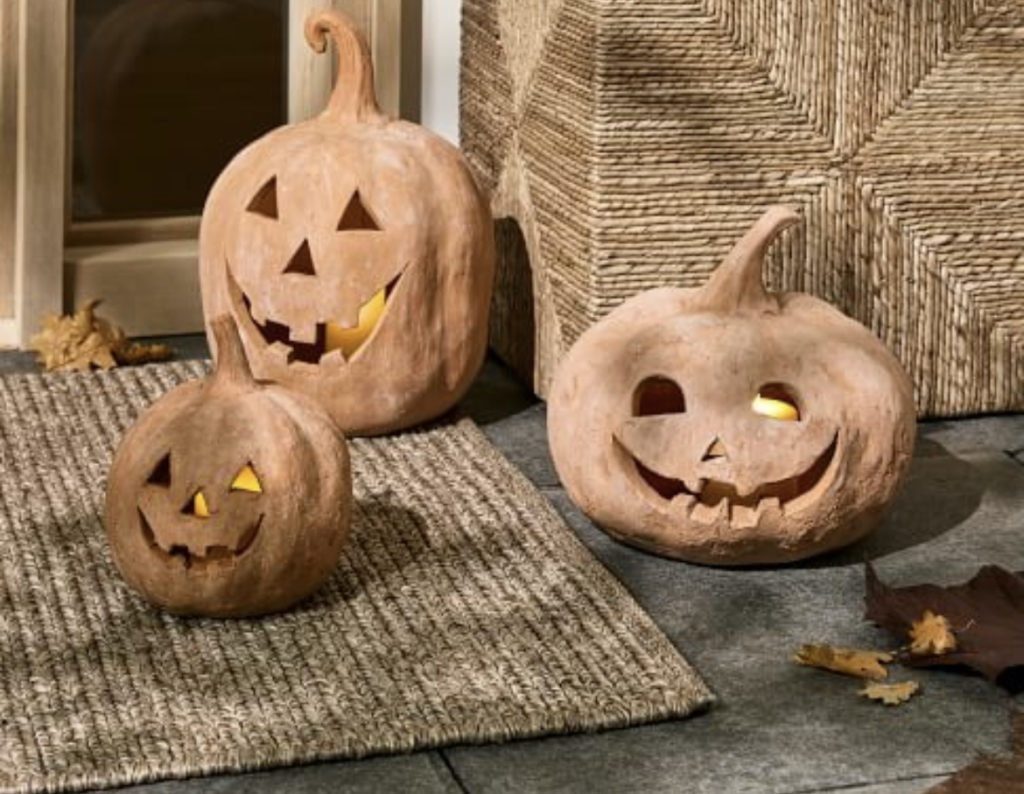
Halloween is just around the corner making it the perfect time for some new decor. We have a lot on our plate these days so I didn’t want to do anything that took a lot of time or was overly complicated. I loved the idea of these terracotta pumpkins from Pottery Barn, but like many things, they cost more than I was hoping to pay for seasonal decor and honestly a little creepy. What if I could make a less pricey and happier version of the jack o’lantern? So that’s what we did for under $22. Check out below how to make your own terracotta pumpkins!

Pottery Barn Terracotta Pumpkins
Tools You Need:
  • Artificial pumpkin / Jack o’lantern
  • Pencil
  • Utility knife (optional)
  • Air-Dry Clay
  • Terracotta colored paint (I used orange, brown and white)
  • Paintbrush
  • All-Purpose Flour
Prep your Pumpkin

I started with a “cut your own” faux pumpkin. This one came from Target, but I also saw them for a few dollars more at Michael’s Craft Store. The pumpkins are made from a very firm foam that will last year over year, but it is very malleable and  you can cut into any design that you want. 

Fair warning, like anything artificial these pumpkins do smell a little chemically when you can into them. The smell will fade over time and will quickly become a none issue.

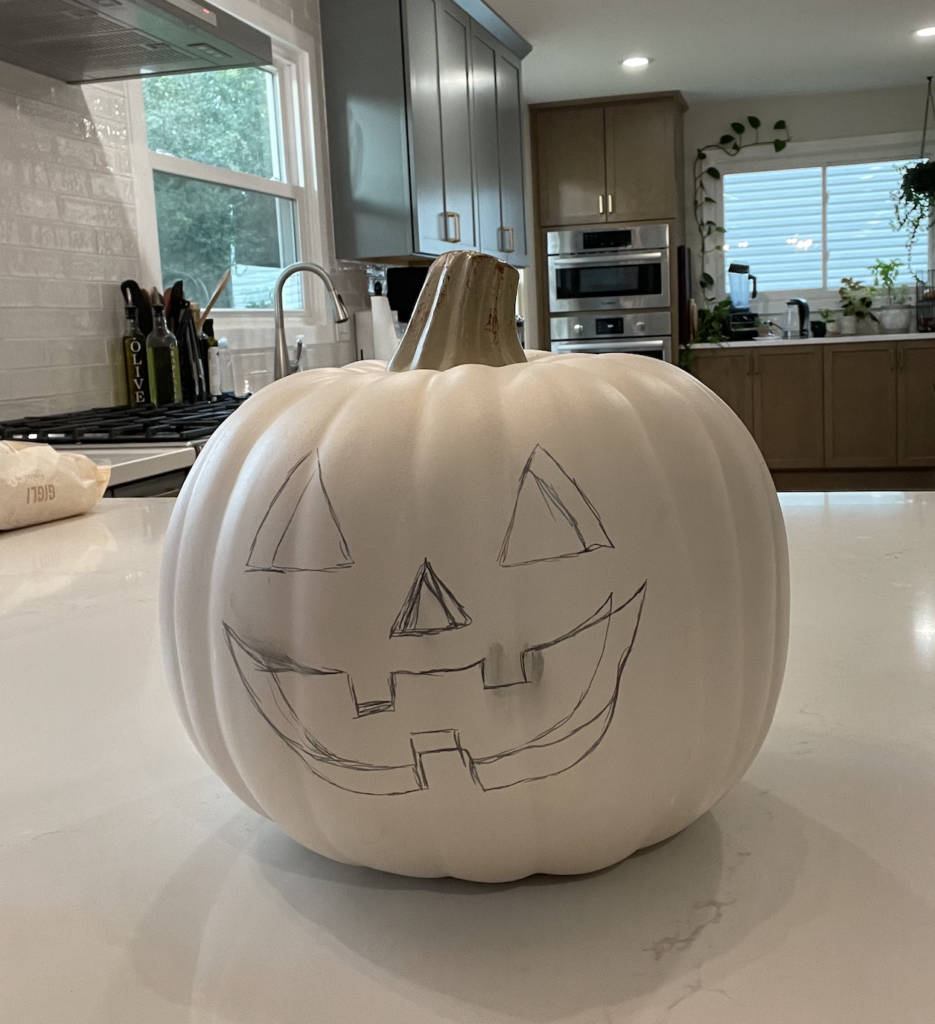
As an alternative you can totally use a pre-cut jack o’lantern. (I’m just cheap and these cut your own were a less expensive option costing only about $10).

I drew out my design and used a utility knife to begin cutting out my design. I was able to make adjustments and create the perfect happy pumpkin face.
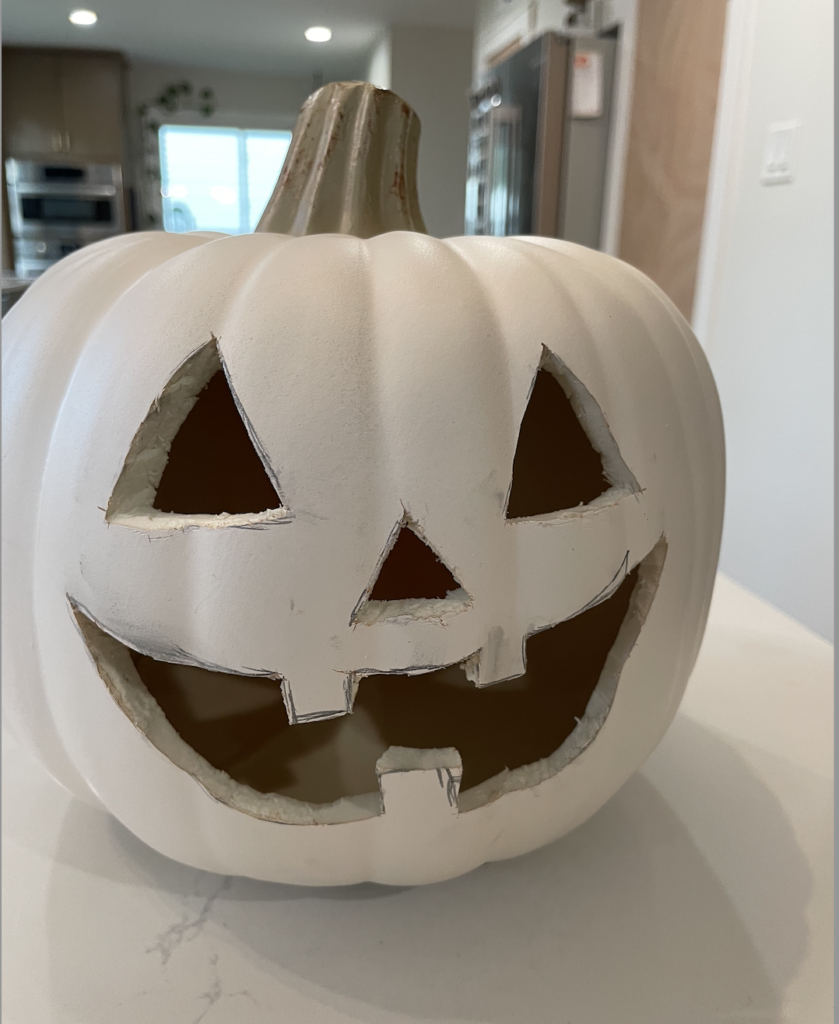
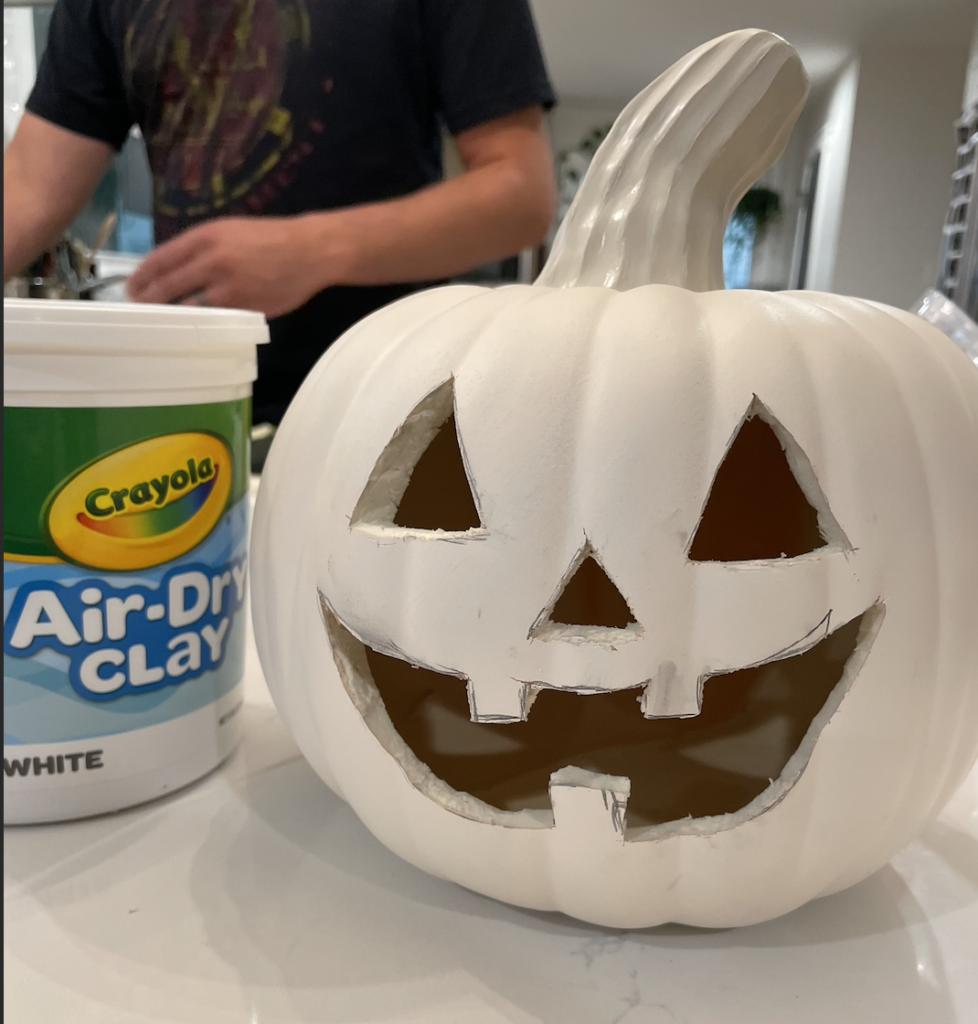
 
 
Using Air-Dry Clay

Now that my pumpkin is smiling, I wanted to extend the stem to make it more substantial. For this I used Crayola Air-Dry Clay with you can get at any craft store or online. It works like normal clay with the caveat that rather than needing to bake it, it takes about 48 hours to completely dry. 

crayola air-dry clayTIP: When working with any type of clay, water is your friend. It’s a great tool to help make the clay more moveable, smooth out edges and gives you more precision. 

There were some cracks in the clay once it dried. I’m honestly not sure what I could have done to prevent that as it was totally smooth when it was wet. To fix this I grabbed some paintable caulk that we had from other projects and filled the cracks in. Like the clay adding a little water made the patched areas smooth and completely undetectable. 

Making The Jack O’Lantern Into A Terracotta Pumpkin

The caulk only needs 30 minutes to dry and then it was time to start painting. To get the perfect terracotta color, I used acrylic paints that I already had in my craft supplies. I mixed orange, brown and white paint until I got the color that I was happy with. (I have found that you can get very reasonably priced acrylic paint from Target – only $1 per container!)

Since we’re going for a terracotta pumpkin look, you can paint the pumpkin all over including the stem. I didn’t worry much about the inside since you can’t really see it without shadow, but if you can I recommend painting that as well. 

My one regret is picking a white pumpkin to start with. They came in a few colors including blue and and orange. In hindsight, I think the orange would have been the best option. With the white pumpkin I ended up needing to do 3 coats of paint just to make sure it was completely covered. With the orange I probably could have gotten away with less. 

adding flour to the pumpkinWait until the paint on the terracotta pumpkin is completely dry.

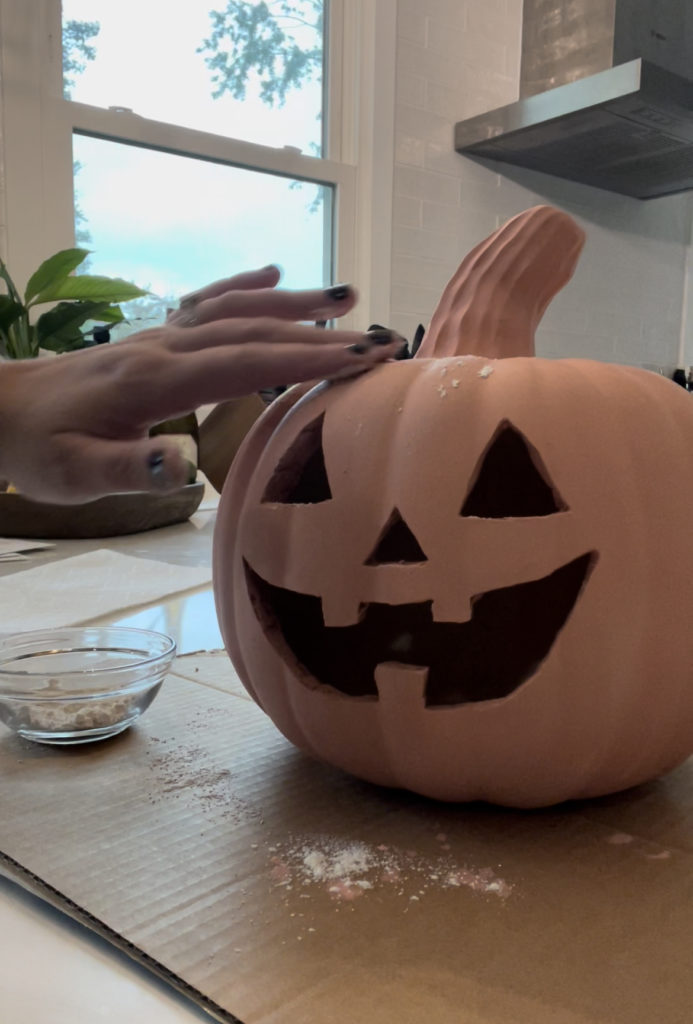
So how do we take this from a regular orange jack o’lantern to a terracotta pumpkin? (This is where it gets really good!) It’s so simple! All it takes is some good old fashion all-purpose flour.

Get ready to get your hands dirty because the easiest way to apply the flour is with your hands. Gently pushing the flour into the surface of the paint, the flour will stick to the surface. Once the pumpkin is covered, you can use a clean brush to lightly dust off the excess flour. 

Overall the flour sticks on pretty well and I haven’t seen any remnants falling off onto our table, but only time will tell if flour needs to be reapplied next year. 


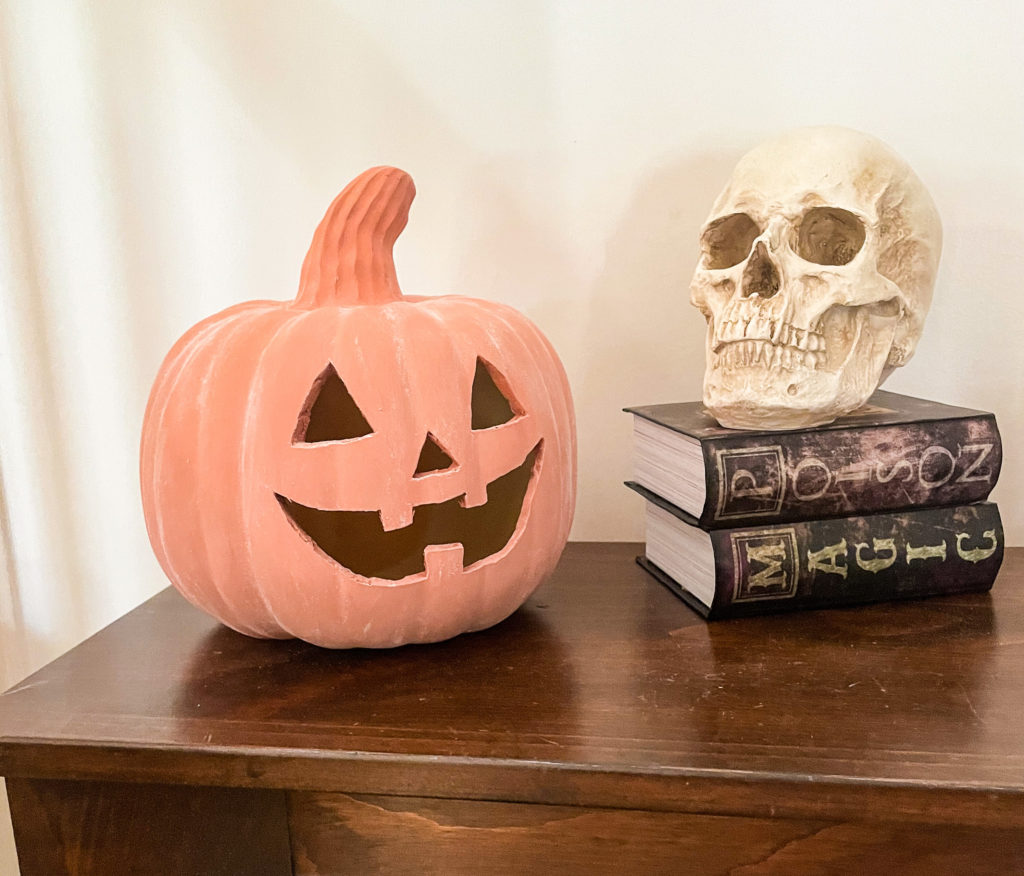
How cute is this finished product!? Does it look completely like the original terracotta pumpkin? Of course not! But I actually like mine more. With the combination of the hand crafted stem and the dusty terracotta top coat, it really does look like a terracotta pumpkin. What do you think? Would you try to make your own?

Other Terracotta Dupe Uses

There are a ton of other things you can do the terracotta look from besides just the pumpkins. While I wouldn’t recommend doing any outdoor decor, you could totally do some cute spring time bunnies for your sunroom or even make an existing pot look like terracotta. 
Don’t want to use flour? 
Baby powder would also be a great alternative if you’re worried about bugs (although I haven’t had any issues so far). What will you make? Tag me in your terracotta pumpkins! I can’t wait to see them!


Posted By: Kristen · In: DIY

Our Biggest Project Yet!
Make These Simple DIY Velvet Christmas Trees

You’ll Also Love

green velvet ribbon wrapped around cones to create a modern christmas treeMake These Simple DIY Velvet Christmas Trees
dough bowl filled with snowy pine cones, evergreen and candlesChristmas Coffee Table Decor so Easy to Make and Looks Gorgeous
Christmas Garland with eucalyptus and pine conesThis is How to Make Christmas Garland Look Expensive

Leave a Reply Cancel reply

Your email address will not be published. Required fields are marked *

Recipe Rating


Trending

  • Want a Black Interior Front Door? How New Trim And Paint Change Everything
  • Our Beautiful Traditional Brick House With Black Windows Remodel
  • Mini Chicken and Waffles – The Ultimate Brunch Appetizer!
  • Glass Barn Doors Gave Our Office A Stunning Modern Look
  • Gray, black and gold powder bathroom
    Get the Room: Details & Links – The Powder Room

Categories

  • Blog
  • DIY
  • How-To
  • Lifestyle
    • Kristen’s Book Club

More You’ll Love

Quickly Remove a Bathroom Vanity

Quickly Remove a Bathroom Vanity

Love Gold Accents? How to use Rub n Buff to Update your Look

Love Gold Accents? How to use Rub n Buff to Update your Look

Change your Home’s Whole Look with Simple Custom Door Trim

Change your Home’s Whole Look with Simple Custom Door Trim

ourhowtohome

Scarlett Annette Mangold ♥️ You are so so lov Scarlett Annette Mangold ♥️ 
You are so so loved baby girl.
One view of this nursery just isn’t enough😍 One view of this nursery just isn’t enough😍

We’re days away from meeting our little girl and if she’s anything like her parents we’re in big trouble! 

At least the room is cute. 

#nursery #babygirl #nurserydecor #nurseryinspo #nurserydesign #safaribaby #safaritheme #littlegirlsroom #38weekspregnant #whitefurniture #refurbishedfurniture #refinishedfurniture #diyhomedecor #diyprojects #housetohome
We’re so ready for you baby girl! When we starte We’re so ready for you baby girl! When we started working in the nursery there was not a chance I thought it would be totally ready in time. Close? Sure. But finished? No way. 

We are so lucky to have so many people help us along the way (and for getting so many great deals on marketplace to bring this room together!) 

Now all we need is a little girl to use it!

#nursery #nurserydecor #nurseryinspo #babygirl #babygirlnursery #safari #animalnursery #facebookmarketplace #refurbished #38weekspregnant #nurseryideas #babygirlroom #homedesign #bedroomdesign #changingstation #safaribaby
Bookshelves for the nursery are FINISHED!! Can yo Bookshelves for the nursery are FINISHED!!

Can you believe this was all done with scrap wood that we had in the garage? 

For our baby shower we asked guests to bring a book in lieu of a card and im obsessed. We have the perfect amount of new stories to fill our shelves and a million memories to make in this cozy nook. 

#booknook #bookshelves #bookshelvesofinstagram #childrensbooks #nursery #nurserydecor #nurseryinspo #scrapwood #scrapwoodproject #reelsinstagram #memoriesforlife #snuggletime #cozynook #reelsvideo #nurseryroom #nurseryinspiration #childrensroom #reelsviral #childrensroominspo
What a year it’s been! I feel like we’ve don What a year it’s been! 

I feel like we’ve done so much work to the house this year but when it’s almost all in one room, I’m realizing it doesn’t always look like it. 

With the nursery almost ready to go and baby girl coming any day, we can only begin to imagine the great things 2023 is going to have in store for us! 

Happy New Year everyone!

Thanks for sticking around and being a part of our story 💜

#newyearseve #2022recap #2022wrapped #homeprojects #2023 #happynewyear #housetoahome #primarybathroom #livingroom #homedecor #renovation #newyear #recap2022 #reelsofinstagram😍 #reelsvideo #homesweethome #homedesign #nursery #boardandbatten
GAME CHANGER After years of making gingerbread h GAME CHANGER 

After years of making gingerbread houses and waiting the torturous overnight for the icing to dry we finally asked the question - why are we doing it this way?
 
Hot glue for the win! We saved the icing for decorating and the brownstones we’re ready for decorating immediately. 

Even Kevin who was a skeptical gingerbread traditionalist agrees… we’re never going back!

#nevergoingback #gamechanger #rowhomes #gingerbreadhouse #gingerbread #reelsinstagram #instagood #christmascrafts #christmasdecor #reelinstagram #christmasreels #holidayseason #christmasvibes
When I found this sleigh in the Target dollar sect When I found this sleigh in the Target dollar section, I knew it needed to be part of our holiday decor this year. Only problem? It needed a little something extra- queue for the stain! 

This updated sleigh is so cute and the perfect addition to our mantle. I found this pine cone filler and mini ornaments to complete the look! 

#christmasdecor #sleigh #pinecone #miniornaments #mantledecor #merrychristmas #holidaydecor #holidaycrafts #reelsvideo #merryandbright #stain #sleighride #christmastime #holidayseason #reelforyou #christmasmantel
Load More... Follow on Instagram
  • Privacy Policy

Copyright © 2023 Our How-To Home · Theme by 17th Avenue